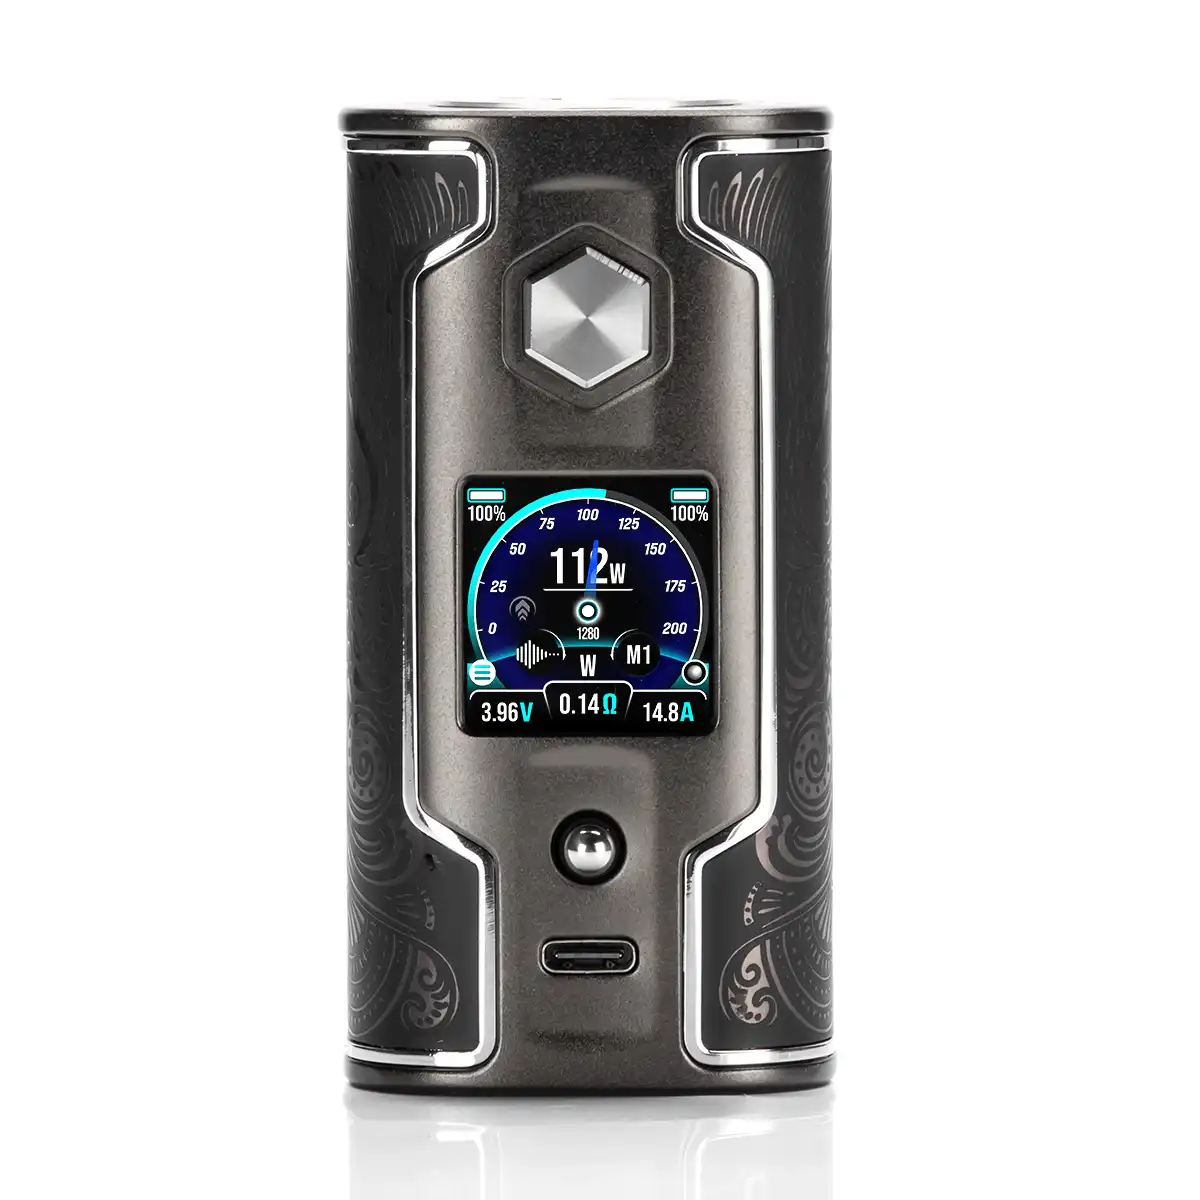
ARE YOU OF LEGAL SMOKING AGE ?
Yes , I am of legal smoking age No , I am not of legal smoking age

Keep away from children and pets
WARNING: This product contains nicotine. Nicotine is an addictive chemical.


SXmini G Class V2 Review by Ecigclick
Company News2022-04-08

SX MINI G Class V2 Review by Ecigclick In for review this week we have the long awaited SX Mini G Class V2 mod. This is the second version of a mod that came out way back in 2016! SX Mini have been hard at work on this, and despite the fact that it's immediately recognisable as a G Class, there's a lot of changes under the hood. SX Mini have mainly been involved in vape mods from the SL Class V1 and SX Mini SL Class V2 to the X Class plus even some pod kits including the Mi Class and MK Class.

1.jpg


What Can We Expect From The G Class V2 by SX Mini?

Right at the end of 2016 the original G Class came out. The chip inside was one of the first that could compete evenly against Evolv's DNA board and it came with a full colour screen. Remember, this was before we had the C (colour) versions of DNAs. SX Mini produced a few different version of the G Class, including some rather gaudy (imo) Gold versions. 6 years later we have the V2! From the outside the new version looks very similar to it's predecessor, however they've changed a lot for the V2. There's a new chip with the latest temp control, in fact there's now actually two chips running the G Class. One is dedicated to vaping, and the other runs the whole UI of the mod. They've also waterproofed the chips which should help if there's ever an accident due to a tank leaking.

2.jpg

on the base, we now have replaceable side panels. Finally when it comes to updating firmware, there's no need to plug it into your computer. This mod can handle all of that over it's built in Wi-Fi, you just need a phone that can read a QR code to set it up. One big elephant in the room is the fact that this mod is using 18650 batteries, rather than 21700's. I'm a big believer in 21700 batteries, but I still feel they make most sense in single battery mods. In a dual battery mod, I'm quite happy to continue to use 18650's and have a slightly smaller mod, but your mileage may vary! There are plenty of user modes to keep you amused including Variable Wattage, Variable Voltage, 4th Gen Temperature ControlBypass, Intelligent Curves and Smart Boost. This was sent over for the purpose of review directly from SX Mini (thank you) as usual, this will not affect my review, and I shall report back honestly with what I find.


In The Box

4.jpg

  • SX Mini G Class V2 Mod

  • USB Cable

  • QR Code for user manual

  • Warranty Card and Battery Safety Card

  • Protection sticker for base of mod

Not much for such an expensive mod! And compared to some of the lovely braided cables I've seen recently, the one that comes with this is a bit of a let down.

3.jpg

Minor? Sure, but I'd have liked better.


Specs

  • Dimensions: 94mm x 47.7mm x 34.3mm

  • Weight: 150g

  • Power Output: 10-200W / 0.7-6V

  • Battery: 2x 18650

  • Modes: VW, 4th Gen Temperature Control, Intelligent Curves, Smart Boost

  • Display: 1.3in TFT IPS Screen

  • Material: Zinc Alloy & Aluminium, ABS

  • Temperature range: 100-300°C / 212-572°F

  • USB Type C - 2A charge rate

  • WiFi connection for over the air firmware updates, wallpaper, themes and language packs

  • Live clock wallpaper

  • Interchangeable magnetic battery door panels

  • Max size of tank: 30mm

  • Chipset: waterproof YIHI SX750J

  • Coil Resistance Range: 0.05 - 3.0Ω

  • Temp Ω Read precisions: 0.0001Ω

Design and Build Quality

At the moment, the G Class V2 only comes in two different colours. Matte-Black (which I received) and Space-Gray.

5.jpg

However SX Mini have a history of producing many different varieties of the original G Class, so I wouldn't be at all surprised to see some limited editions arriving in the future. Not to mention the fact that the battery doors are now interchangeable, so there is likely to be a range of options in the future!


Body

The oval shaped body is very comfortable in the hand, it's not a heavy mod. But it feels reassuringly solid. The fire button is place centrally, with the gorgeous screen, beneath it.

7.jpg

Below that is your 5 way joystick and the USB port that will allow charging at 2A. In one of the biggest changes to the construction of the original G Class, you no longer access your batteries with a hinge bottom.

6.jpg

Battery Doors

This time the batteries are covered on either side by magnetically attached panels.There's a nice little divot on the back of the mod to easily get your fingernail in to lift them up. Polarity indication is clearly marked inside, and the bottom contact is spring mounted to allow you to easily pop in your batteries. The addition of battery ribbons means they're also really easy to remove.

8.jpg

The two magnets on each door are very strong on here, so I was never worried about jostling them loose. They also slot in to the front of the mod with a couple of tabs. 

The doors themselves have a very subtle pattern on them, I believe it's a phoenix? But as it's slightly glossy black on top of matte black, it's not at all garish. In fact I really like how they add a little more interest to what could have been a boring bit of the device.

10.jpg

When you get your mod, the doors that will be on it are made of an Aluminium Alloy, these are pretty solid and they certainly contribute to the weight of the device. However unlike the previous G Class, with the ability to change your doors, you'll be able to massively change the look of the mod. SX Mini sent over a couple of battery doors so I could see this in action, when I first looked at them I thought there wasn't much difference. And on the outside there isn't, they have the same pattern, except the one that comes with the mod (at least on my example) has a bright silver trim and the other a gunmetal. 

11.jpg

But where they are different is what they're made of, the replacement doors are injection moulded Plastic. This not only cuts down noticeably on the weight, but should mean that replacement doors don't cost too much in the future, and I'm really interested to see what range of options SX Mini comes out with! Looking at the images SX Mini provide of the G Class V2, it looks like it might be the plastic doors that actually come on the mod, as they match the colouration for the black mod that I received. 

·12.jpg

The good news is that they don't in any way feel "cheap", and feel just as sturdy, though lighter, than the metal ones. Top Plate The 510 connector is centred in the middle of the mod, and despite being a relatively small mod in the hand, SX Mini say this will take up to a massive 30mm tank without overhang.

13.jpg

In fact this is only the diameter of the 510 plate that is secured by two Torx screws. As you can see, there is still some body in front and behind this plate. So you can actually go up to a 33/34mm diameter tank, before it starts to noticeably overhang the body of the mod itself! Unfortunately I don't actually own any tanks that will really challenge this. So I have taken a picture of it using the Steam Crave Aromamizer Plus V2 which has a 30mm diameter. As you can see, there's still a little bit of space, though it does perfectly match the 30mm plate.

14.jpg

Base

The base is held on by three Torx screws, in white there is the name of the mod, the serial number, and all the regulatory marks. One notable "exception" is that there are no vent holes. 

15.jpg

This is because in the event of a thermal event, the doors that cover the batteries will be the venting route, probably popping off to release the gasses. The other oddity is that you get a little plastic sticker in the package. When I originally saw this I thought it might be a protector for the 510 plate. However as there's no hole in it I quickly worked out it was for the base!

16.jpg

It's easy enough to apply, if you peel it back from one side, line it up, you can then just lay it down and protect the base a little for when you put it down. Does it really matter? No. But it's a nice attention to detail to keep your mod looking good.

17.jpg


Back Panel

On the back of the device is a rather large "SXmini", this lights up when you're vaping. I'm honestly not sure how I feel about it, because obviously when you're using the mod, you're never really going to see it yourself. However if you're using it in the dark, then your hand is going to light up so everybody else does!

18.jpg

As with many things on this mod though, it's up to you if you want to customise it. You can change the default brightness of the logo (including having it turned off totally) and with "Night mode" you can even set it to have a different brightness level between set times of the day.


Screen and Controls

The screen on this is a lovely 1.3" TFT IPS screen, it's bright and colourful, and also set into the mod a little, so you're unlikely to scratch it. There's a few different themes and you can see there's quite a lot of detail on the screen.

19.jpg


Above this is the metal hexagonal fire button. It's quite a firm press that you need to engage it, but it's nice and tactile and has a good click to it.

20.jpg

Below the screen is the 5 way joystick, up/down/left/right and click in. This is also made of metal, and though I thought it might be hard to get on with, it's really responsive and easy to use.

21.jpg

It does protrude out of the mod a little though, so I would recommend locking this button if you're putting it in your pocket.


Charging

There's good news and bad news about charging this mod. The good news is that it will charge at a reasonably fast 2A using an USB A to C cable like the one provided. The bad news is that it will not charge with a USB C to C cable. As almost all of my cables now are straight USB C cables, this is a bit of a pain, and means that if I want to charge this on the go, I'll always need to remember to bring an A to C cable.


Main Controls and Getting Started

5 clicks on the fire button will power your mod on for the first time. When you first attach a new tank to the mod you'll be asked to lock in the resistance. This is most important for temp control.


Quick Menu/Shortcuts

You've got two layers to the menu, the first is the quick menu which you access by the central joystick. There's a number of shortcuts that you can activate without diving into it properly


  • Hold Up/Down changing the wattage/temp/voltage (dependent on mode)

  • Hold Right - Change the colour of the font

  • Hold Left - Change the background image (if you're in a theme that allows it)

If instead you press in on the joystick, you get to access all the various quick menu settings. These are:


  • Wattage / Temp / Voltage (mode dependant)

  • Memory settings

  • Curves

  • Mode - Wattage, Voltage, SS316, SS430, Ni200, Titan (Titanium), TCR and Bypass

  • Main Menu

As well as accessing the main menu this way, you can also press the fire button 5 times if you know that's where you want to go.


Main Menu

Once in the main menu, you've got access to your other settings split over two pages.


  • Temp Limit

  • Puff Counter

  • Shutdown

  • Smart Boost

  • Wi-Fi

  • Tweaks

22.jpg


  • Themes

  • Language

  • Time & Date

  • Exit

  • Stats

24.jpg

Rather than going exhaustively through every option, I'm going to pull out some of the most interesting and useful changes further into this review. If you have any questions about specific options, feel free to ask a question via the comments and I'll try to get back to you!


Lock/Unlock

Locking and unlocking the mod is done with 3 button clicks, however you can either lock the joystick, so disabling your adjustment buttons, but still allowing you to fire by clicking in 3 times on the joystick. This will be shown by a Red circle in the bottom right Or you can lock the whole mod, by clicking the fire button 3 times. Doing this will show the clock and the lock icon. In practise, I almost never locked the whole mod itself, as you need to press pretty firmly on the fire button. But I did find it useful to lock the joystick, especially if I was sticking the mod in my pocket.


Clock

And yes, as I mentioned above, you get a clock on this! There's an option of 4 different clock faces, 3 analogue and 1 digital. On the digital one you can also change the background and the colour of the text. Sadly there's no options for customising the analogue clocks. Hopefully in a future firmware update we'll get more options.

25.jpg

How Does the SX Mini G Class V2 Perform?

I've used the G Class V2 now as my main mod for the past couple of weeks. I've tried a variety of different tanks on it, from smaller mouth to lungs, to big dual coil DL RTAs like the Oxva Arbiter RTA.

23.jpg


Navigating the Menus

The menu system in this mod takes a little getting used to, but once you have, I found it really easy to get around and change the settings. The one thing that took me a while to get my head around, is the fact that you really don't need to go into the main menu all that often. Once you tweaked some of the advanced setting to your satisfaction, almost everything you need can be controlled just with the joystick and the quick menu.


Battery

One negative thing that YiHi were known for on some of their older boards, was battery drain when the mod was left with batteries in it. There's a couple of things that SX Mini have done to mitigate this. For starters, you now have an "auto shut down" option. So you can set the mod to power itself off after a period of time that you set in the menu. That's all well and good, but as we all know, when your mod is "off" it still has to use a tiny amount of charge to turn itself on again when you press the fire button 5 times. It's for this reason that I don't think SX Mini really mean you to power down the mod all that often, to do so, it's buried at the bottom of the main menu. So does the battery drain when it's left sitting there? I tested it by leaving it alone for a couple of days. I couldn't leave it any longer as I have had to spend the rest of my time reviewing it. However, I left my batteries at 78% and 79% charge, when I picked it up again two days later? The percentages were exactly the same. So no, parasitic draw I don't feel is an issue. After this review goes live, I'll run some longer tests (for a week) and I'll update if I see anything notable.


Temp Control

Since it's one of the things YiHi chips are known for, I couldn't do a review on the G Class V2 without mentioning how it handles temp control. I'm not a diehard TC fan, but I've played around with it plenty over the years and like to use it from time to time. When you first go into a TC mode, you'll be prompted to lock your resistance, and also set the ambient room temperature. A 10 minute countdown will pop up on screen, but don't worry it won't use all of that. That's just to make sure that it has long enough to get a stable reading, especially if you've been using something like SS in wattage mode previously and so it might still be a little warm.

27.jpg

In practise this always happened within 2 minutes for me, even if it was a coil I'd previously used in wattage mode. As a quick test I popped and RDA on the G Class V2, stuck a TC coil in, wicked it up, saturated it, then let it burn dry until it wouldn't fire. As expected, the temp control kicked in at exactly the right time. The cotton was noticeably drying out, and was just starting to show a little bit of browning in the centre at the hottest part. However temp control that works well, was pretty much expected for a YiHi board. So some of the interesting things actually live in the Temp Limit settings of the main menu. There are three settings that show some of the innovation that has been worked in to temp control.

26.jpg


  • Constant/Dynamic Temp Module

  • Auto Resample

  • Avg. Room Temp

The first one is probably the hardest to explain, as what it does is it uses the temperature that you set not as an upper limit, but as a guide. The idea being that based on the coil resistance, it will allow slight fluctuations in temperature over your set temp to make sure you get the best vape. Auto Resample is one of the cleverest tricks, and probably really useful for people who often use temp control when they're switching between different environmental temperatures. Because temp control is really just measuring the change in resistance of your coil, if you set you temp control up at room temperature, and then go somewhere really hot. The temperature, and therefore resistance, of your coil will change slightly. What auto resample does, is it will take the resistance of the coil when the mod is put to one side and "idle". So rather than locking in your resistance, it will allow it to change, but crucially it will only happen when you haven't been recently firing the mod. Finally the avg room temp, allows you to set what the average temperature is where you're using the mod. By knowing this, it can get a more accurate reading of how the resistance is changing when you fire, and therefore get an even more accurate temperature control.


Wi-Fi

It's certainly not the first mod to allow over the air updates, but SX Mini have done a really nice job with how they've handled it. Rather than trying to get an app on the app stores, the Wi-Fi settings are designed to hook your mod up to your router, and then you navigate an internet control panel on your phone.

28.jpg

When you switch Wi-Fi on you have to join the network that the G Class V2 creates. Once you've joined the network, a QR code will pop up on the mods screen, and scanning the code will take you to a page to see available networks and enter your WiFi password. Remember, this isn't connecting to your phone's internet, it requires you to have an internet connected network to connect to. Once you've set it all up you have options to:


  • Update your firmware

  • Change your themes

  • Upload new wallpaper

  • Rename your memory settings

  • See the manual

29.jpg

One nice thing, is that the manual section isn't just the manual that you get taken to when you scan the manual QR code. You also get some videos showing you things like the basic operation or setting up temp control. Really nice to have this all in one place! One thing to note is that the WiFi chip inside the G Class V2 is that it uses a 2.4Ghz chip. That means it's not the fastest to download updates. To test this, I updated all my firmware and themes. In total it took it 6 minutes to download and update from the time I told it to apply the update. One of the plus sides, unlike a DNA device, you don't have to attach it to your computer to update the firmware. And by using a web browser rather than an app, SX Mini avoid having to get an app approved by the powers that be.


Smart Boost

Now obviously the mod has the usual range of curves available, I haven't gone into them in any great detail in this review as there's nothing revolutionary happening here. They are all percentage based, which means you can use the curve across different wattages.

30.jpg

However one little tweak is the "Smart Boost" functionality. Normally, a boost will front load the power delivery to your coil. This is especially useful for high density coils that take a while to get up to temperature. Once they have been vaped once, you're not going to need the boost again if you're vaping on it continually, as the coil will already be heated. So Smart Boost allows you to only use the boost on the first draw, and then control how long you need to leave it alone, before it requires another boost. 

31.jpg


I've tested this out with a few different tanks and it does the job really nicely. There's definitely some experimentation you need to go through to work out what time to set it too (default is 30s), but once you get it dialled in, it performs beautifully.


Anything else?

One thing that I quite like, is that you can tell the mod what the CDR (continuous discharge rate) of your batteries is. This means that dependent on the wattage you set, and the resistance of your coil, the mod will warn you if you're pushing the batteries harder than you should.

32.jpg

This is found in the Tweaks section of the Main Menu. If he's tested them, I will always advise using Battery Mooch's estimated CDR, rather than whatever the manufacturer puts on them. Obviously it's always going to be an estimate, and in reality if you're not sure how to build for your batteries, you should read up about battery safety and Ohms Law. So this is really just a "nice to have" type of feature.

33.jpg

If you raise the wattage so that the amps drawn are expected to be higher than the CDR of the battery, it will alert you by putting the estimated amps in red.


Pros

  • Great featured Temp Control

  • Waterproof Board

  • Changeable battery doors

  • Hugely configurable on device

Cons

  • Can be a little overwhelming at first if you dive straight into the menus!

  • 18650 not 21700 (subjective)

  • Only charges over USB A-C, not C-C cables

Final Review Verdict

So, that was the SX Mini G Class V2! Although this review is now over 3000 words, I've actually only scratched the surface in terms of the options you can play around with. This is definitely a fully featured device! Temp control has definitely had a lot of love lavished on it for this upgrade. Especially the option to have the mod resample the resistance of the coil. I can understand why people might be worried about this, but in my testing I never ran into any issues. The new design of the mod with the magnetic battery doors is also a welcome change. I really like how well they're put together, and even though they're only held on by two magnets, I never felt like they were going to come off. I'm also really keen to see what additional battery doors come out for this in the future. Finally I will say this isn't the easiest mod to learn your way around, especially if you've never used a YiHi chip before. But everything is laid out and accessible in a sensible way, it's just a little different to what you may be used to.


Update:

I've since heard back from SXmini regarding the reason for it not charging over USB C to C, and it all comes down to safety. Unfortunately USB C as a standard is a bit of a mess, and it is "typically" used for much faster charging. I'm not sure whether there is a way to restrict the charging current at the board level when the charger might be trying to throw up to 100W down the cable, but it all relates to the different charging protocols that USB C can support. Since USB C devices tend to charge at much faster speeds, there's a risk to your batteries/mod/house if you were able to plug it into a 60W charger and leave it overnight (don't ever do this with a mod!) So no points knocked off for this (after all, safety is far more important than dealing with a little inconvenience) and as usual I would say that charging externally is the best way to go, using a good quality external battery charger.


Other things I like but ran out of space for!

  • Probably the first mod I've used where I actually like the puff counter. It has a daily puff counter, a manually re-settable one (like a trip odometer) and a total lifetime one.

  • It's nice and easy to upload photos to use as wallpapers. Who doesn't enjoy that?

34jpg.jpg

Let us know what you think of the SX Mini G Class V2 Mod in the comments below!

ARE YOU SOCIAL
FOLLOW US
NEW PRODUCTS. GIVEAWAYS.

© 2010-2023  Copyright  Dongguan Yihi Electronic Co.,ltd.  All Rights Reserved.  |  粤ICP备14098942号 STARKAY


CHAT NOW


 +0086-

18002877892

(After-sales)

首页(英文)1_04.jpg

+0086 

18680087570

(Sales inquiry)


关于_13_04.png  Larson
关于_13_04.png  Lawrence

关于_13_04.png  Mila


关于_13_04.png  Amy
关于_13_04.png  Angelina

image.pngimage.png

(overseas business only)